areas of the country, where the sun position is more angled.
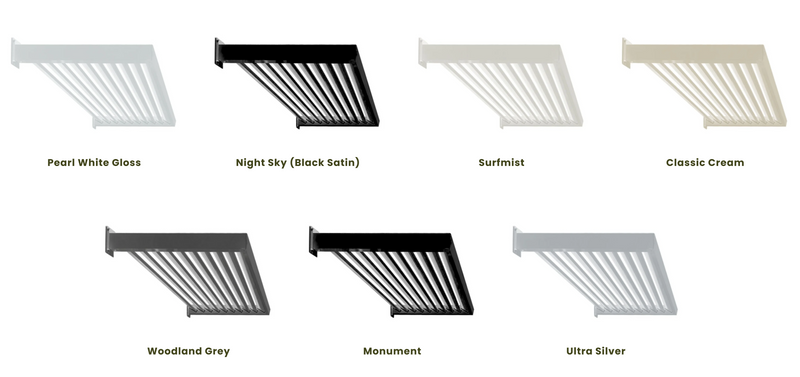
Choose your Colour
Other powdercoat colours can be ordered for an additional fee, just send an email to our team for a quote.
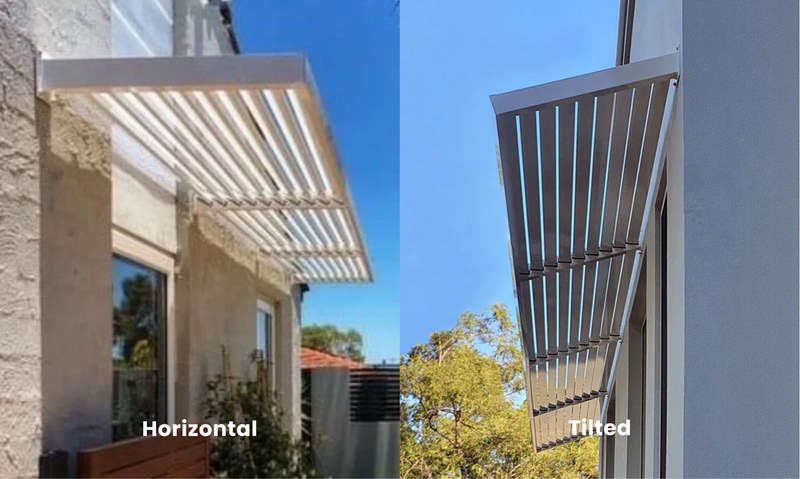
Choose your Awning Style
Other powdercoat colours can be ordered for an additional fee, just send an email to our team for a quote.
How to Measure Up
Identify which windows need awnings or hoods (north-and west-facing windows often need the most protection). Measure you window widths and note anything that could interfere when fixing an awning above them.
General rule of thumb is 15-45cm beyond the widow frame on either side. The more the better for window shading.
Perfect for a DIY project or self-install
Panels click into the frame by hand, so all you need to do is assemble it and secure the brackets to the wall above your window. This means no messing around searching for extra bits and pieces from different suppliers, you get everything you need in the one package.
Excellent 4.6 | 100,000+ Customers
All aluminium awning. No painting required.
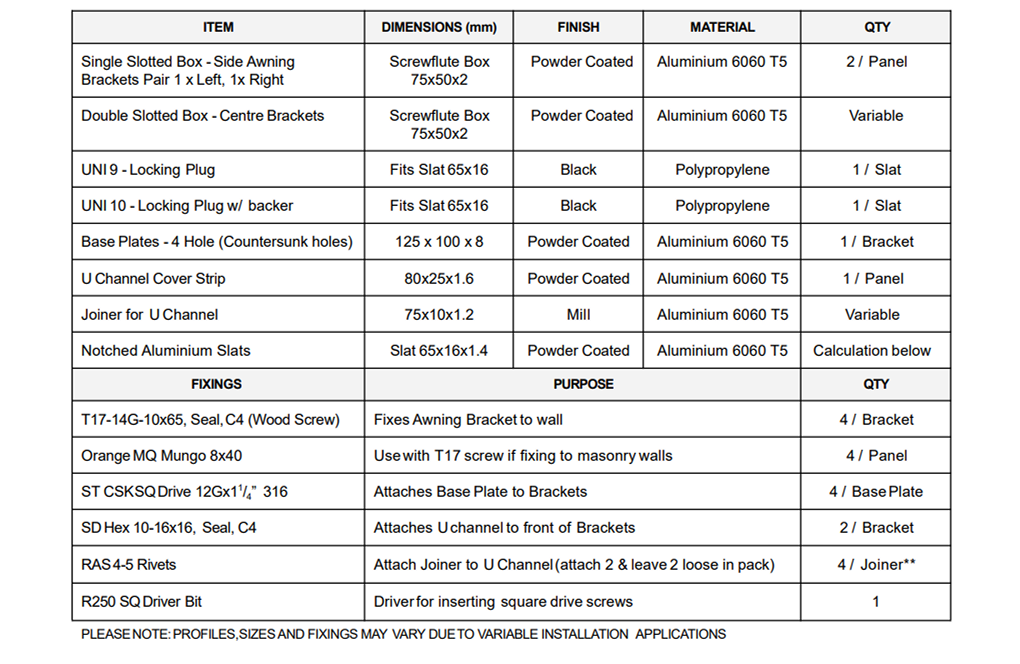
The louvre awnings are made of 6060 or 6063 T5 Aluminium with thermoset powder coating in 7 popular COLORBOND® colours! The result is a durable, weather resistant and low maintenance product. They are also corrosion, flame and termite resistant, as well as tested for a N3 wind load rating and BASIX thermal comfort. Sizes larger than 2250mm wide include a centre bracket, so the slats are split into two sections for ease of installation and transportation as well as improved stability.
Protects windows from heat penetration.
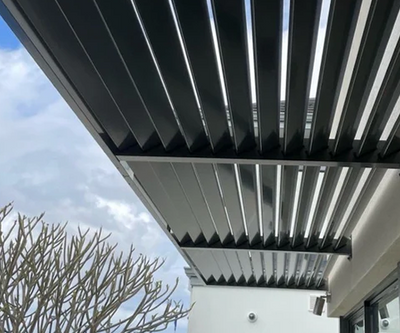
If you're after superior awnings that are going to stand the test of time, Australian-made Clik'n'Fit® lightweight aluminium window hoods are the way to go. With the 5-6mm spacing of the louvre-style slats you'll have little to no sun on your window during those later times of the day. This also makes them perfect for the far southern areas of the country, where the sun position is more angled.

Keeps your house temperature stable.
With a few of these added to your home, you'll reduce solar heat gain by up to 65%, thereby helping to cut energy costs and lower your carbon footprint. If you've got some high rise neighbours, then the louvre window hoods also give an extra bit of privacy.
DIY installation. Everything included
Perfect for a DIY project or self-install - the panels click into the frame by hand, so all you need to do is assemble it and secure the brackets to the wall above your window. This means no messing around searching for extra bits and pieces from different suppliers, you get everything you need in the one package. You are also able to choose either a right angle screen (pointing straight out from the wall), or at a slight downward angle.
No rattle from lose slats in the wind.
The Clik'n'Fit system means you don't have to drill and screw every slat. No stripped screws, no oversize holes and no rattle from lose slats in the wind. Sizes larger than 2250mm wide include a centre bracket, so the slats are split into two sections for ease of installation and transportation as well as improved stability.
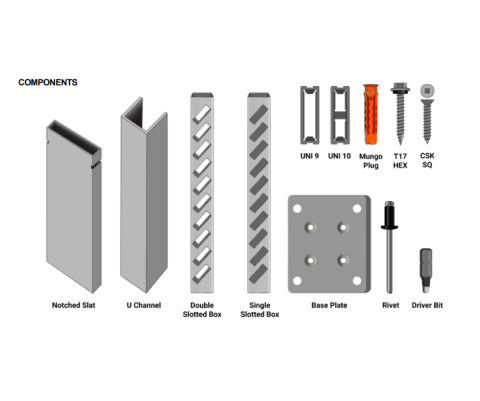
What’s in the Box
Clik’n’Fit® Awnings are a quick and easy to install modular system, suitable for DIY.Please follow the instructions to ensure your screen is installed securely and will look its best.
Components Included:
- Awning Bracket 75x50mm (single routing) including locking plugs (your choice of right angle from wall or 15° tilt)
- Mounting plate 125x100mm
- U Channel & End Plugs
- Notched Slat (65x16x1.4) Flatpack (number based on height of screen)
- (For panels over 2000W) Centre Bracket 75x50mm (double sided routing) including locking plugs
- Fixings pack for masonry or timber; other materials, such as foam, require specialty fixings which are an additional cost.

Yes! Please contact us with your custom dimensions or fill out the form linked in the custom size quote tab. Please keep in mind the maximum span between mounting brackets is 2000mm, but the total width can be over 5 metres and the maximum depth of bracket is approx 900mm (Distance off wall).
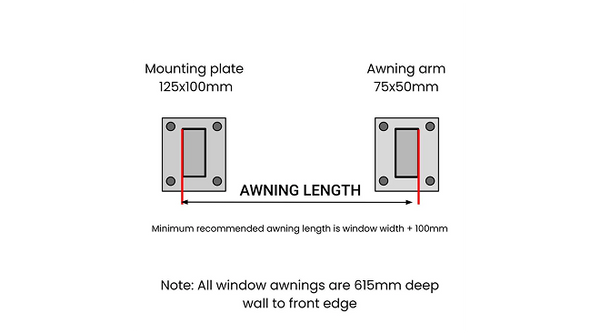
Take roughly 100mm off the total distance of your selected size. This should be approximately the width of your window (or any other area you want covered). Generally you want a bit of overlap, so a 1950 is suitable for an 1800 wide window. A diagram is shown in the PDF install document.
Outside of bracket, far end to far end. The wall fixing/base plate may be 25mm wider on each side.
That depends on the angle of the sun. All of our units have 65% heat block and the same gaps between slats, it is up to you to decide if an angled down awning is more relevant to your needs than a straight one. I have suggested to clients in the past to get a big piece of cardboard or such and put it above your window and see what casts the largest shadow.